

![]()
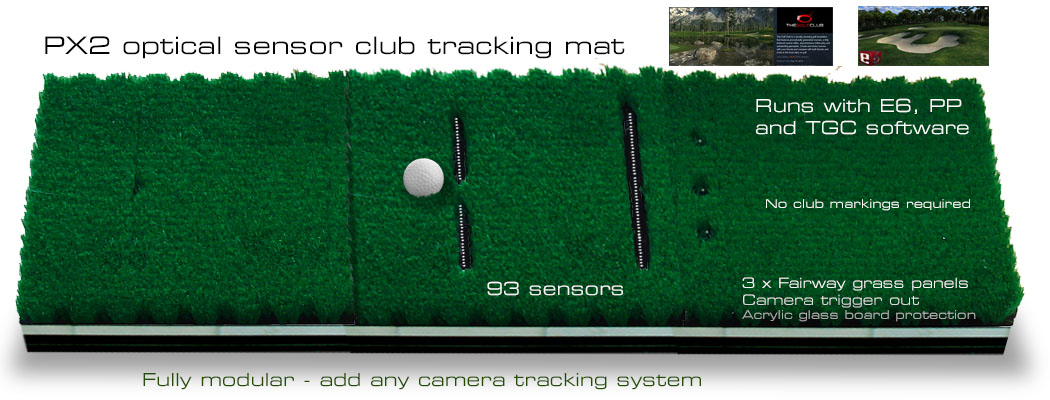
PX1-PX2-PX3 Club Tracking Sensor Mat
Installation
PX2 Setup Video
![]()
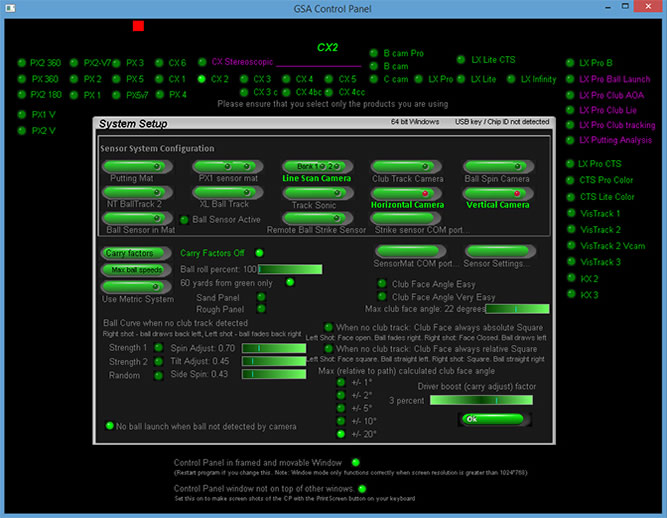
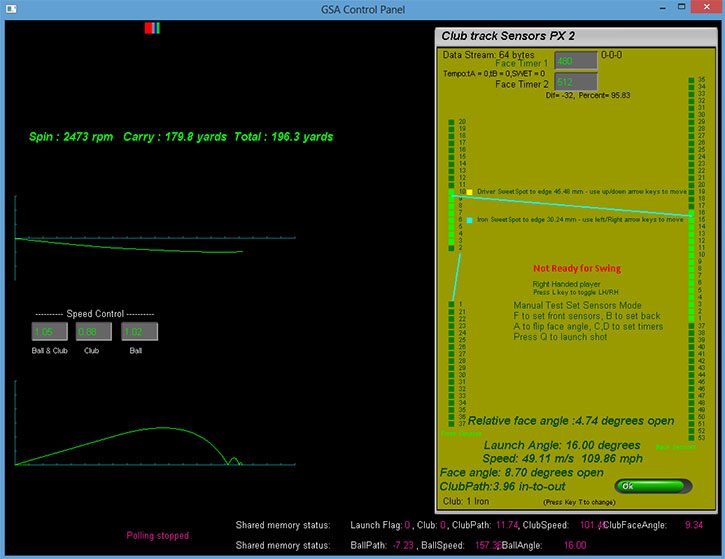
GSA Control Panel
The GSA Control Panel is an application that monitors all GSA camera and optical sensor ball and club tracking systems
and should always be ran along side any of the 3 golf game programs (i.e. ProX, GSA Golf or E6).
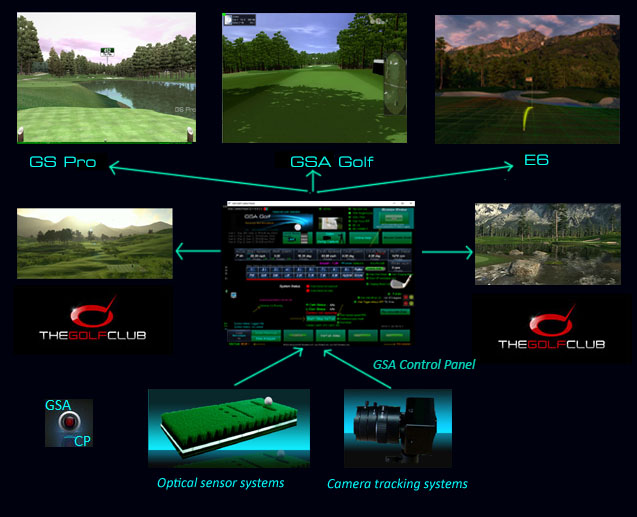
All optical sensor serial I/O, camera image grabbing and processing is performed by the GSA Control Panel.
Ball and club data captured by the GSA Control Panel are passed on to golf game that is currently running. (i.e. either ProX, GSA Golf or E6)
GSAGolf Control Panel is not normally visible during game play. It is a process that runs in the background.

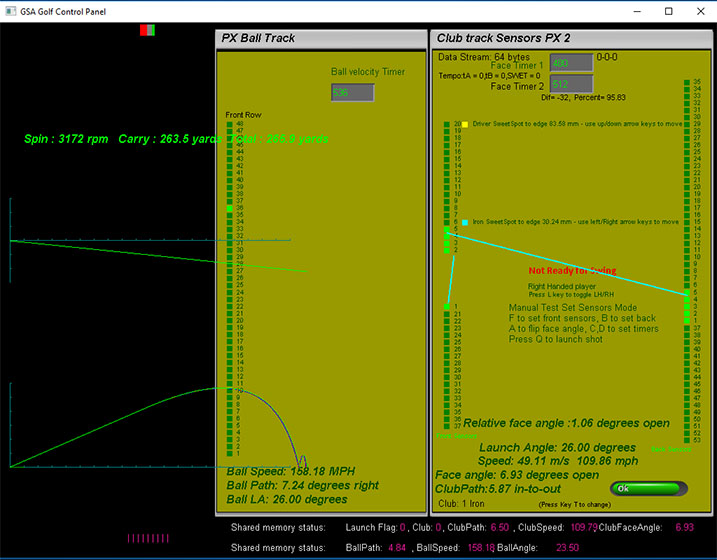
The above screen shot shows the GSA Control Panel's main window.
When the control panel detects a valid shot from any of the ball or club tracking systems it passes the shot parameters via a shared memory area on the PC to the game applications.
These parameters, such as ball speed, launch angle, ball path, club speed, path and face angle etc, are shown in pink text.
When the game application receives these parameters it calculates the ball trajectory and launches the ball.
The white edit boxes can be used to manually set any of these parameters. Just set as required and right mouse click anywhere in the screen to send the parameters to the shared memory.
The game application will then launch the shot using these parameters to calculate the trajectory.
-
When your system is connected to the PC you should see - depending on what system you have - that the sensor mat has been detected and the cameras are running. This information is shown at the bottom left of the screen.
You will notice a small green square box at the top left of the screen. This box indicates that the connected tracking systems are running and ready.
Should this box turn any other color then this indicates a system is not running correctly and that the system requires attention to resolve the fault.
This system indicator box is also visible in the game applications during play.
-
Ordinarily the GSA Control Panel is not visible during game play. It must, however, be started before play can begin. After starting the Control Panel and you see the green box you should click the Send Back button.
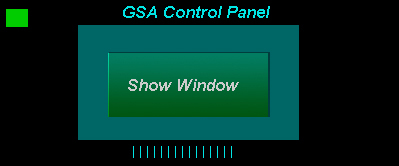
This will minimize the window size so that you only see the above screen at the bottom left of the screen. You can then see your desktop and can start one of the game applications.
PX1 and PX2 optical sensor club tracking mats can either run as stand alone systems or combined with camera ball tracking systems.
When used alone, select PX2 in the Setup window of the GSA Golf Control Panel. When used with V and H cam ball tracking cameras select PX5
Connecting the PX club tracking sensor mat
The PX2 sensor mat is connected to the PC via a single USB cable.
Important note: Do not use an ACTIVE USB cable with the PX2 sensor mat. Just use regular non-active USB cables and extensions
When first connecting the mat to the PC you will see the following messages showing the USB serial driver being installed.
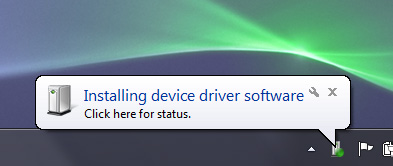
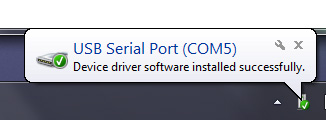
After this process disconnect the sensor mat again to proceed to the next process.
-
Microsoft Serial BallPoint disable
Windows still has the annoying habit of automatically installing a Microsoft Serial BallPoint mouse when any Serial device is first connected to the PC.
The Microsoft Serial BallPoint mouse has to be disabled before you can use either the PX or FX sensor mats.
To do this open the Windows Device Manager before connecting your sensor mat to the PC and do not start either the GSA Control Panel .
(See instructions below to see how to get to the Device Manager. if you don't know how to do this)
Re-connect the sensor mat to the PC.
( Note: You may find that the Windows mouse cursor is moving occasionally during this procedure.)
You will see that the Device Manage has updated itself with the new devices after connecting the sensor mat.
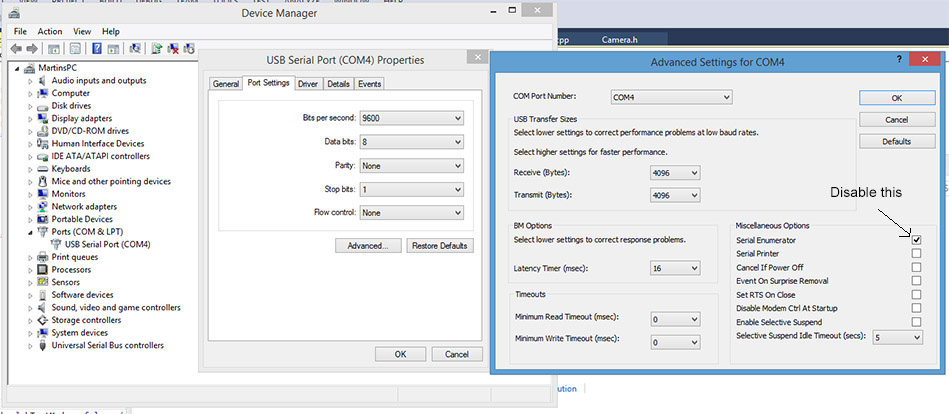
Click on the "Ports (Com & LPT)" item, click on the "USB Serial Port(COM)" item, Select "Port Settings" then "Advanced...." then disable the "Serial Enumerator" setting. i.e. so that there is no tick in the box - then click OK.
COM port setting for the PX sensor mats
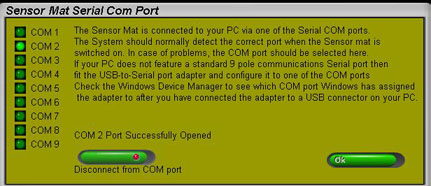
In order for the PX2 to communicate with the host PC via the serial connection, the correct COM port must be selected in the Sensor Mat COM port window.
This COM port selected in this window must correspond to the COM port shown in the windows Device Manager
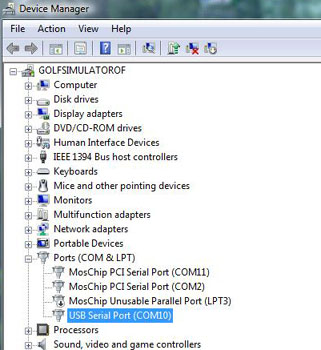
Go to the Windows Device Manager and click on the Ports (COM & LPT) item to see which COM Port windows has assigned the serial port on the sensor mat to.
The above image shows that the PC has two PCI serial ports and one USB Serial Port.
Sensor Mat Serial adapter COM port assignment
If you find that the sensor mat serial adapter has been assigned to a COM port greater than 9 or you want to change the com port then you can re-assign the com port number as follows:
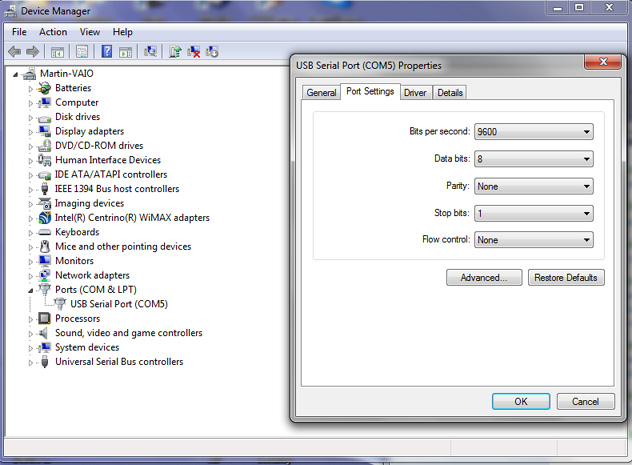
Right mouse click on the USB Serial Port and select the Properties item . From the Properties window Click on the Advanced ... button.
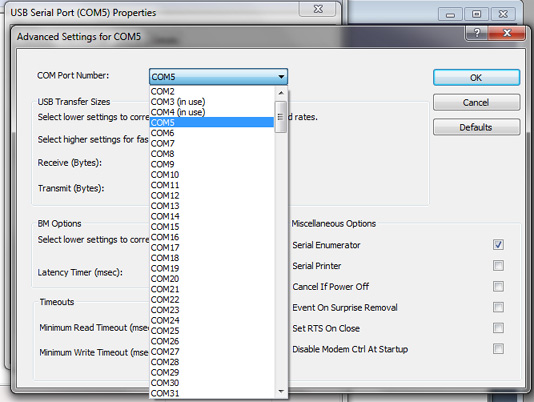
Select the desired COM port number from the drop down box.
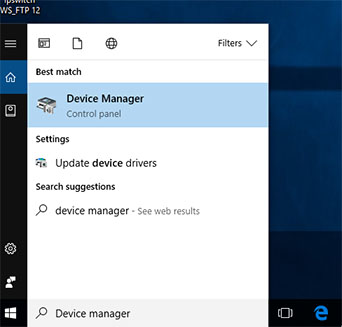
How to get to the Windows Device Manager
In Windows 10, just type "Device Manager" in the "Type here to search" box at the bottom left hand corner of your desktop screen.
In Windows 7
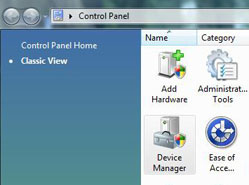
In Windows Vista you get to the Windows Device Manager via the Windows Control Panel
In Windows 7 go first the the Control Panel
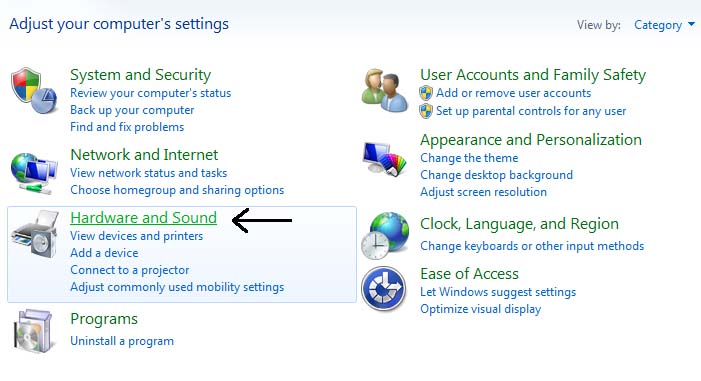
Click Hardware and Sound
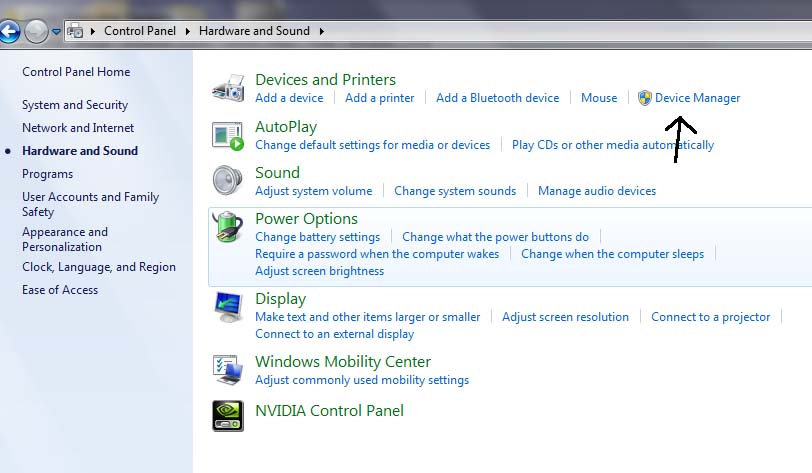
Click Device Manager
Once you know which COM Port number to use, go back to the Sensor Mat COM port window, select the same port number and click the Connect to COM Port button.
You should see that the port has been successfully opened. (The button text will then change to Disconnect).
This procedure has only to be made once. From then on, the system will automatically connect to this port.
Overhead lamps
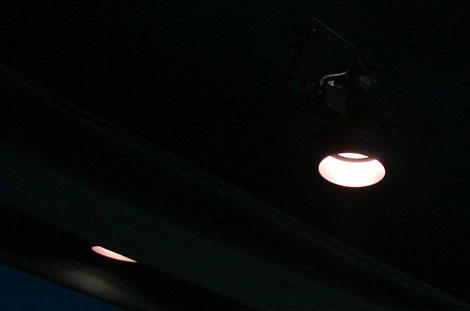
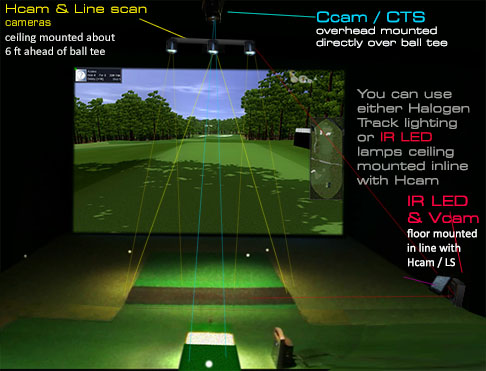
All GSA optical sensor systems are shadow based and require an overhead lamp to function.
The above image shows the complete recommended lighting setup for camera setups.
Important: The PX2 club tracking lamp must be a narrow spot beam type 50 watt and should be mounted directly above the sensor mat.
I
Testing the GSA PX2 Sensor mat
Restart GSA Control Panel.
You should then see the Sensor Mat Detected message at the bottom left hand side of the screen
![]()
-
Both the sensor mat and camera triggers and or sensor ball tracks require an overhead halogen spot lamp light source of between 50 and 70 watts to function
and there should not be too much ambient light in the room.
Ensure that the overhead light spot is directly above and pointing directly down on to the sensor mat.
Go to the Setup Window again and go to the Show Sensors window.
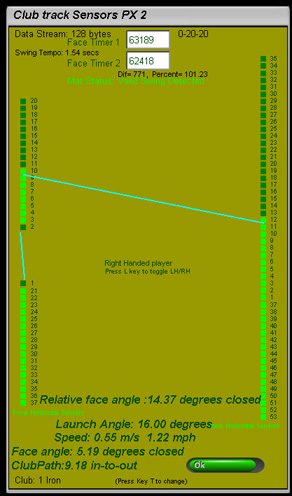
After a swing, you should see that both face timers have stopped counting and a valid path angle has been detected.
When passing a club over any one of the 3 reset sensors at the back of the sensor mat all sensor indicators in the window should go dark green except sensors 1 and 2.
You should also see that numbers will be changing in the timer windows.
When passing a club head over the sensor mat you should see that the corresponding sensor indicators in the window are being lit.
When making a swing you should see the Valid Swing Detected with the associated club head information (ie club head speed, path and club face angle).
If you are only using a GSA PX2 Sensor mat, you are now ready to play.
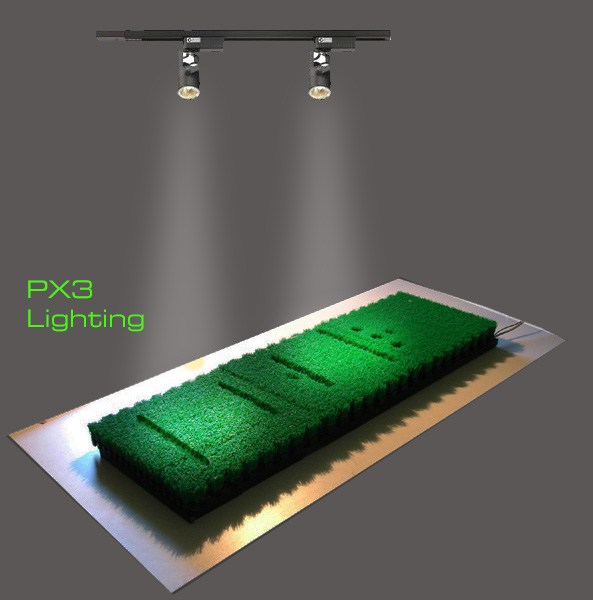
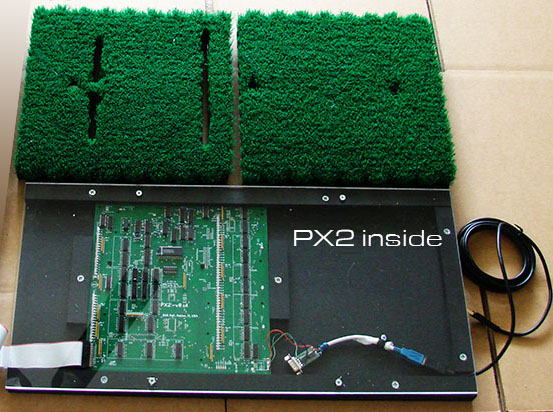
Inside the PX2

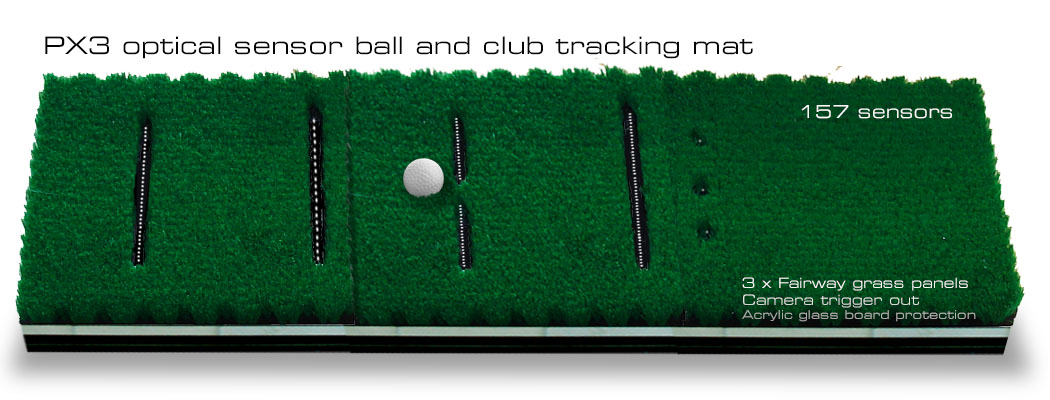
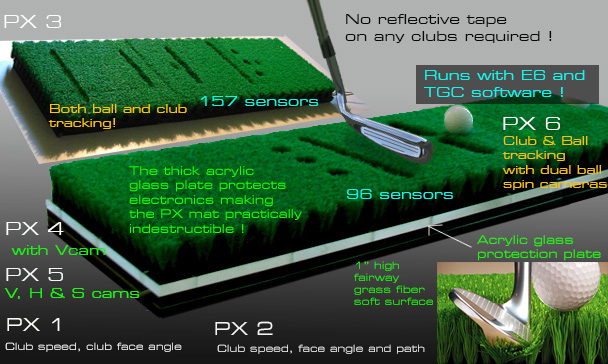
The PX3 adds ball tracking sensors to the PX2 sensor mat. Its setup is the same as with the PX2 mat.
The PX2 requires two overhead halogen lamps:
1 is mounted directly over the 3 reset sensors at the back of the mat and the other directly over the ball tracking sensors in the grass panel extension.
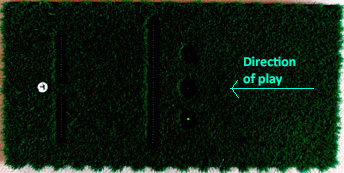
Note that only 1 to 6 sensors in the ball track are latched by the ball. These latched sensors represent the front of the ball.
After these first few ball sensors are latched, all further sensor latching is blocked so that only the front of the ball can latch sensors and not the following club head.
Remote ball strike sensor
The remote ball strike sensor is used in systems that either only use camera ball tracking cameras (e.g. CX2 model) or only an optical sensor club tracking mat (e.g. PX2) to prevent inadvertent ball launches.
Inadvertent ball launches can occur when using just a sensor mat when tee-ing up or waving an object (a club or your hand) over the sensors.
When using just ball tracking cameras (like with the CX2) then inadvertent ball launches can occur when players move around in the field of view of the cameras while holding a club to pick up balls lying around in the enclosure.
The remote ball strike sensor prevents this by sensing a ball strike acoustically.
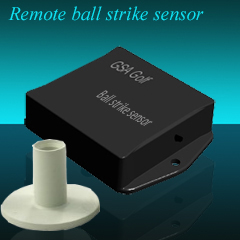
The sensor is in a rubber tee holder that should be embedded in the flooring turf or mat near the hitting area. In the case of the CX2 system, embed the unit near the putting area so that it picks up putts as well as full shots.
Make a hole to fit the tee holder in the grass turf carpet. Cut the tee holder down so that it is flush with the surface of the carpet or mat.
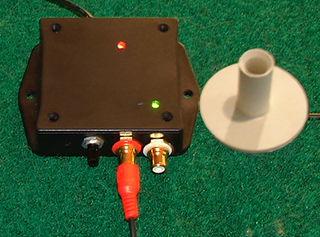
The unit is connected to the PC via a USB cable and has it's own COM port.
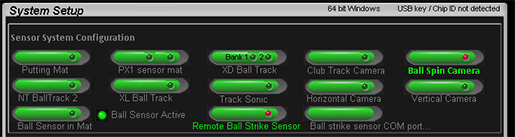
When using the strike sensor, select the Remote Ball Strike Sensor option in the Setup window of the CP and select the Ball Sensor Active button.

After connecting the unit to a USB port on the PC, check the Windows Device Manager to see which COM port it has been assigned to.
Then go to the Ball Strike Sensor COM port window - from the Setup window in the CP - and select the appropriate COM port.
A sensitivity dial is on the side of the unit to adjust the sensitivity so that it picks up all shots. LEDs indicate power and trigger pulse.
-Ball path ratio of club path and face angle for PX2 or Ccam users
If you are using just club tracking without ball tracking - i.e. PX2 or Ccam only - then the ball's direction is calculated from the club.
In the new CP you will see a new slider bar in the Setup window that controls the ratio of club face and club path that is used to calculate the ball path.
(actually this bar has been in the CP for some time but was hidden in the sensor settings window before)
![]()
If the slider bar is set to 100% of the Club Path then the ball path will follow the club path. If set to 100% of the Face angle then the ball's direction will be the same as the club face angle.
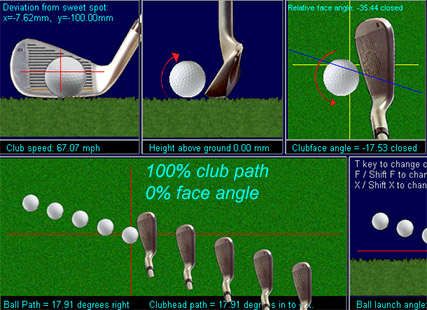
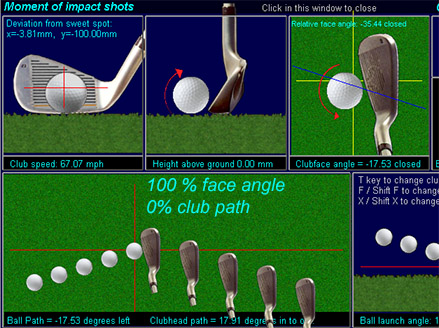
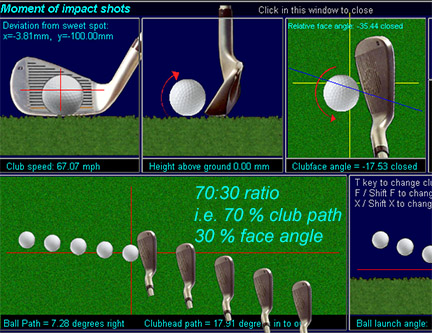
In reality the ball's path will be a certain percentage of both the club path and club face angle. In the real world this ratio varies somewhat from club to club and shot to shot so there is no hard and fast rule or setting.
The user should this ratio as he or she prefers. A 70:30 or 50:50 is recommended though.
Ball position on club face using optical sensor mat
 -
-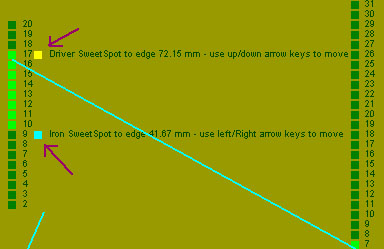
In order to determine this ball position we need to know the distance the sweet spot is from the outer edge of the club. As this distance will vary from club to club we made it user definable.
In order to keep things as simple as possible we're only using a user definable distance for irons and drivers at the moment.
( In ProX we had these distances for each club in the bag and for each club set but this proved to be too complicated for users to setup.)
In the Show sensors window of the CP you will see two new indicators. These should be set to the sweet spot distance from the outer edge of your driver and an average iron.
You can either measure this distance with a metric ruler or make a slow swing over the mat ensuring that you strike the ball exactly at the sweet spot and setting the new makers to the last latched front sensor.
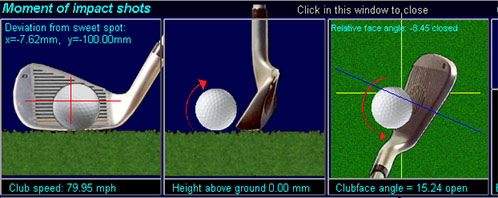
Impact ball on club deviation from sweet-spot will be shown in the post shot analysis window.
Ball on club face position scaling factor.
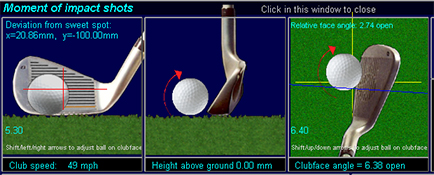
The After Shot swing analysis window now features a "Ball on club face" position scaling factor.
To adjust, hold the shift key down (a factor is then displayed) and use the arrow keys on your PC's keyboard to move the ball.
Use the up/down arrow keys for the top view club/ball image, left/right arrow keys for the club/ball image front view.
Test by playing shots striking the ball on the heel or toe of the club and comparing to the ball position images in the swing analysis window. Adjust accordingly if required.
Club loft adjustment

Club lofts can be changed with CP.
If you are using a GSA Golf system that doesn't measure ball launch angle (like the Ccam or PX2 stand alone systems) then the loft of the club will be used for the launch angle. The ability to change the CP's default club loft angles allows you to match them with your real clubs and/or adjust a launch angle to your normal angle of attack for a particular club type. i.e. if hitting on the down swing then decrease the the loft angle, if hitting on the upswing then increase the launch angle.
If using a system that does measure launch angle then this feature will allow you to fine tune the club attack angle calculations.
Adjustments are made direct in the CP's main window by selecting the club with the T or shift/T keys and then the loft angle with the K or shift/K keys.
The standard loft for each club is displayed next to the current loft angle.
Calculated ball spin adjustments
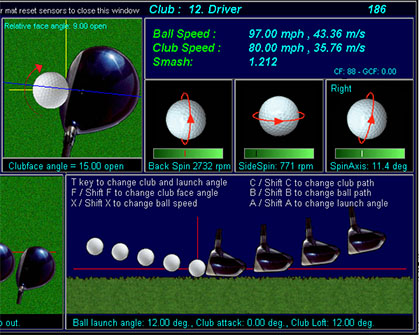
Setting up calculated ball spin adjustment factors is now a lot easier.
Ball spin adjustment slider bars now show new spin rates automatically. Use the slider bars to set to the desired spin rates.
Press any of the keys shown to adjust ball launch and club parameters to see what effect this has on ball spin.
GSA Control Panel main window buttons explained
1. ADC - shows the signal levels of the VX 16 channel Analog Digital Converter (only of interest if the VX or ADX system is being used)
2. Camera - opens the Camera control window (only of interest if cameras are being used)
3. Show Sensors - shows the status of the optical sensors (only of interest if an optical system is being used, i.e. sensor mat or ball track)
4. Setup - opens the setup window. Use this to configure the system with whatever optical sensor or cameras are being used.
5. Exit - closes the GSA Control Panel
6. Sys Admin Lock on/off - you can lock the control panel to prevent your settings being tampered with by others. To toggle the lock on or off hold the Ctrl and Shift keys down and click in the button.
7. GSA/ProX E6 radio buttons - if playing ProX or GSA Golf games, ensure this is selected. If playing E6, select E6.
8. Show Club Angles - shows the after shot swing analysis window
9. After Shot Win on/off - when set on a small window will be opened after every shot showing club speed, path and face angle and ball speed, path and launch angle
10. Full Analysis on/off - when set on, a larger graphic swing analysis window will be shown after every shot
11. Ad Campaign on/off - when set on, user defined advertising banners will be periodically shown during game play
12. Camera image on/off - when set on, the captured ball tracking camera images will be displayed after every shot
13. Game timer on/off - when set on, the game play time will be limited to whatever the administrator has set it to.
14. Carry adjust mode - when set on, carry distances can be adjusted for every club. (Note this function is now superseded by carry adjust features in the game application.
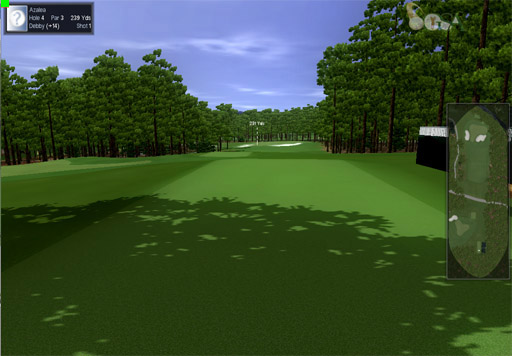
GSAGolf game software (RedChain, E6 or TGC)
GSAGolf game software requires the GSAGolf Control Panel program to run in parallel with it to communicate with GSA Sensor and Camera systems.
GSAGolf Control Panel is not normally visible during game play. It is a process that runs in the background.
GSA Golf Control Panel
GSA Golf Control Panel should be started before you launch GSAGolf. Once you have started GSA Golf Control Panel and the Setup is set correctly
and the sensor systems are connected and powered on, you should see a green cursor in the top left hand side of the screen.
This indicates that the system is running and communication with the GSA sensor systems is running correctly.
Click the Send Window Back pad button. This will reduce the size of the GSA Golf Control Panel and allow you to see your windows desktop.
Now start GSA Golf. (The GSA Control Panel will still be running in the background)
You are now ready to tee off.
Note the bright green cursor at the top left of the screen.
This indicates that all systems are running and the system is ready for the next shot.
This indicator will turn red briefly if any off the mat reset sensors are covered.
If the cursor remains red or is flickering then you need to investigate the cause by going back into the GSA Golf Control Panel.
Use the Alt/Tab keys on your PC keyboard to do this. Click the Send Window Back to get back to GSA Golf or use the Alt/Tab keys again.
-
GSAGolf should be run in windowed mode in order to allow screen window overlays from the interface.
The window is frame-less and when your screen resolution is also set to 1024 * 768 then it will look the same as full screen mode.
(for technical reasons it is not possible to run GSAGolf in Full Screen mode with screen overlays ).
Use the Alt/Tab keys or press the Send Window Back button in GSAGolf Control Panel to see the Windows Desktop in order to launch GSAGolf.
Use the Alt/Tab keys at any time during play to switch to the Interface and back to GSAGolf.
As with ProX, you need to setup the system correctly according to what sensor systems you have and what com port you are using.
For evaluation purposes you can also launch shots with the mouse via the Control Panel.
If you encounter a windows error message stating that it could not find d3dx9_30.dll copy the supplied d3dx9_30.dll to the windows\System32 folder.
With the sensor mat connected to the PC you should then see the sensor mat detected message. After this, all shots should be recognized and balls will be launched in the GSAGolf program.
The GSAGolf Demo program is a full functioning version of GSAGolf that can be used with any GSA sensor mat and ball tracking systems but is limited to just one golf course.
The full version of GSA Golf comes with 85 plus golf courses with many more coming later.
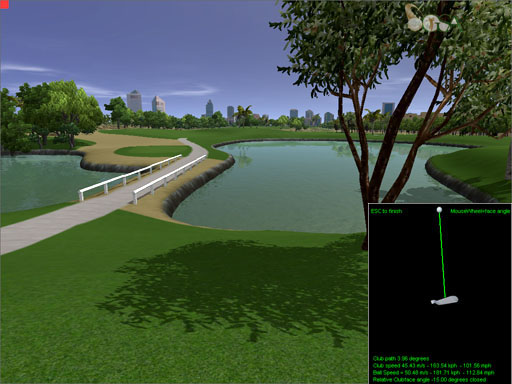
GSA Golf can also be played with the mouse. To do this, go into Game Mode.
Use the mouse to draw back the club and release to launch a ball.
Use the mouse wheel to alter the club face angle - drag left or right to alter the club head path.
Carry distances and trajectory are now shown in the PX2 window of the CP. "Speed Control" Carry adjustments can be done directly from this window now too.
If your PX2 mat is not connected then use the F and B keys to manually set sensors and the C and D keys to set the club speed and face angle.
Trajectory results are automatically updated.
If you encounter a windows error message stating that it could not find d3dx9_30.dll, when starting GSA Golf,
download and copy the d3dx9_30.dll to your windows\System32 and C:\Windows\SysWOW64 folder.

Download here d3dx9_30.dll
Then start the GSAControlPanel program.
Starting GSAGolf Control Panel and GSAGolf with one desktop mouse click
GSA Golf Control Panel and GSA Golf are two processes that both need to be started before play.
Instead of manually starting both processes separately you can start both with one desktop icon mouse click using a batch file.
To create a batch file open the windows Notepad utility program - a basic text editor - and copy and insert the following text:
cd /d "C:\ProgramFiles\GSAControlPanel"
start GSAControlPanel.exe
cd /d "C:\ProgramFiles\GSAGolf"
start GSAGolf.exe
Depending on where you have installed the GSAGolfInterface and GSAGolf, replace the path text (ie "C:\ProgramFiles") with the path where you have installed the programs.
You can determine the paths by right clicking on the desktop icons and selecting Open File Path of both GSAControPanel and GSAGolf.
Save the notepad file with the name "GSAGolf.bat" (or any other name of your choice.)
Using the Windows Explorer, locate the new note pad file you have created (ie GSAGolf.bat), right click and select Create Link.
Then drag the new link to your Windows desktop. Test the link by double clicking on the new desktop link.
You should see that both programes start.
Ensure that the Win Start Back option has been selected in GSA Control panel so that GSA Golf Interface always starts in the Sent Back mode.


 Home
Home Sensors
 Cameras
 Software
 Enclosures
 GSA Courses
 E6 Courses
 Business
 Tech News