![]()


Basic assembly instructions
 -
-
![]()
Need support ?


![]()
SCX Installation

Click the above button to go to the SCX installation page

![]()

![]()
Assembly instruction steps and links


![]()

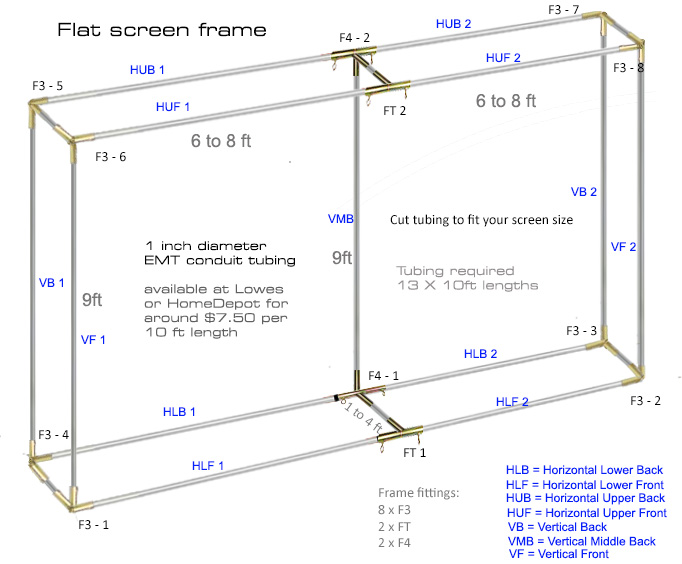
Screen frame assembly instructions
Track drape enclosure screen mounting on the box frame
All screens are supplied with tube box frame fittings
The box frame is self standing but can be fixed to the floor and/or rear wall using 1 inch diameter tube clamps
Note! All screens are supplied with the above shown frame fittings but we don't supply the EMT conduit tubing as freight shipping these inexpensive items is too costly
1inch diameter EMT conduit piping is available at all good hardware stores (Lowes or Home Depot etc) for around $8.00 per 10ft length.
You'll need 13 of them for the complete box frame.
![]()
Frame size to Screen size
The frame should be around 2 inches per side greater than the screen size.
i.e. if the screen size is 12 ft x 9 ft (144" x 108") then the frame should be 12ft 4" x 9ft 4" (148" x 112").


The screen box frame assembly is quite straight forward but does require a little bit of effort and measuring
Start by cutting the conduit EMT piping to suit your screen size width and height and the EX pipes to suit your box depth requirements (usually from 1ft to 4ft).
The conduit pipes come in 10ft lengths so for a 12ft wide screen, the horizontal pipes
(HLB 1, HLB 2, HLF 1,HLF 2 and HUB 1, HUB 2, HUF 1 and HUF 2)
will be cut to 6ft each and for a 15ft wide screen they will be cut to 7.5 ft lengths each.
Build up the box frame as shown in the above image. Start with the floor level horizontal pipes and fittings,
then attach the vertical (VB 1, VB 2 and VMB ) pipes
and finally the upper level pipes and fittings HUB 1, HUB 2, HUF 1 and HUB 2.
Once the box frame is made up, you can start attaching the screen using the supplied bungee cords.
(see below on how to mount the screen with the bungee cords)
If you find that the box frame is slightly too small then you can extend the tubes an inch or two out of the fittings to suit.
If the box frame is too large then the pipes will have to be cut down in length to suit.

For added stability you can secure the frame to the floor and/or back wall with 1 inch diameter pipe clamps.
14 10ft lengths of piping is supllied with the F3 for the box frame screen frame
![]()
How to mount the ceiling drape
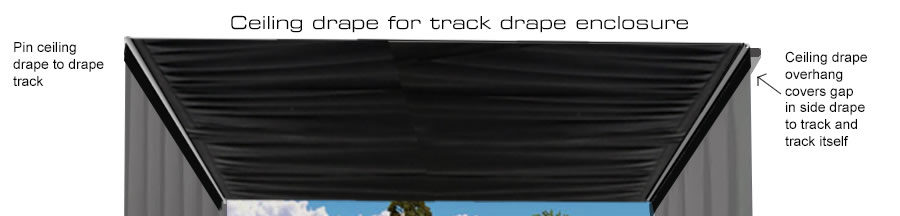
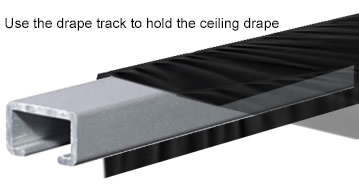
The ceiling drape is sandwiched in between track and the ceiling.
To do this, first mount the tracks loosely to the ceiling using just two screws at both ends of a 5ft length of track..
Note that the drape tracks come in 5ft or smaller lengths so you will doing this in 2 stages if your ceiling drape is 10ft or more deep.
Then - with the help of second person holding the weight of the drape - pass one end of the drape between the track and ceiling while
allowing enough drape width to cover the two ends of the track.
Leave some overhang and screw the other track screws through the drape to the ceiling so that the drape is pinched between the track and ceiling.
Remove the two end screws and spread the drape over the track ends and again fasten with the screws.
Do the same for the other side ensuring the ceiling drape is straight and not too tight.
It's recommended to loosely hang a drape ceiling when using side track drapes so that the drape absorbs the energy of high lofted balls and don't hit a hard ceiling.
![]()
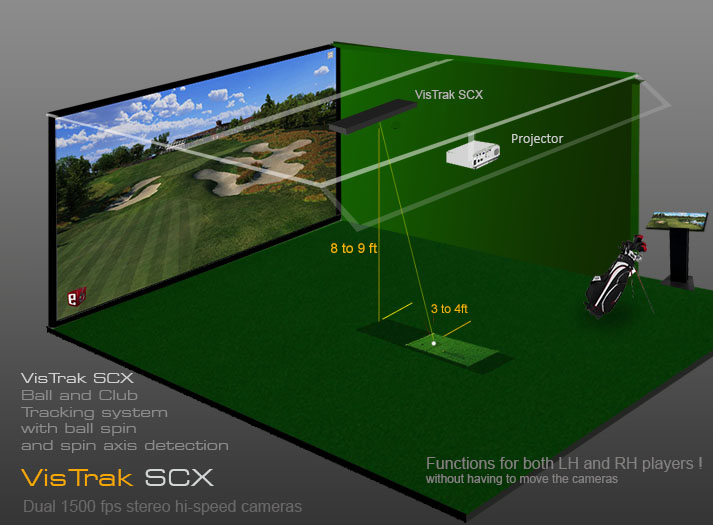
Minimum enclosure size requirements
10ft wide - 12ft deep - 8.5ft high
All systems are custom made to fit your size requirements but sizes shouldn't be much less than the minimum sizes as stated above.
Minimum distance cameras should be mounted from the screen: 5ft
If cameras are mounted closer to the screen than 5ft then light reflected from the screen will / may get into the line scan camera and thus won't function correctly.
It may be possible to mount the cameras a bit closer than this but we cannot then guarantee that the system will work
![]()

![]()

![]()
 Home
Home Products
 Cameras
 Software
 Enclosures
 TGC courses
 E6 Courses
 Business
 Tech News